Deploying the Serverless Framework to AWS from Azure DevOps
Introduction
Recently I worked on a project with the Serverless Framework which I really like. I used it do define a serverless application for a customer that runs their workloads mostly on AWS but uses Azure DevOps to build and deploy resources. This came about because they were already building lots of .Net applications and are therefore used to VSTS, the former name of Azure DevOps.
After recovering from the initial shock of having to use an Azure tool to deploy resources to AWS I gave it a chance (well, I didn’t really have a choice in the matter).
Before I continue, I should say that I was used to building Pipelines in GitLab (and sometimes Jenkins). This is part of the reason why I had some misconceptions about Azure DevOps (as it later turned out). In GitLab you use just one kind of pipeline to build and deploy your application over multiple stages. In Azure DevOps there are two kinds of pipelines: Build Pipelines and Release Pipelines. Only the former can (as of now) be specified as YAML inside the repo, for the latter you need to use the GUI to configure it. The idea is that you use the Build Pipeline to build and/or test your software and create build artifacts. You can then trigger a Release Pipeline that takes these artifacts and deploys them in an orderly fashion with approvals and whatever you need to one or more stages.
Initially I had assumed that all build tools basically work the same - you use a single pipeline to build and deploy your code. Don’t try this in Azure DevOps (yet - approvals for build pipelines have been announced) - it’s not a great experience and will cause you headaches.
Now back to my problem: I had to deploy an application written with the Serverless Framework to AWS from Azure Devops. To achieve this I thought about the steps I need to take:
- I need some kind of instance to run the serverless framework on
- I need to install python (my lambdas are written in python) and NodeJS (for serverless) in the appropriate versions
- I need to install the serverless framework and its dependencies
- I need to package the code together with its dependencies for all three stages
- I need to provide those packages as artifacts to the release pipeline
The release pipeline was expected to be pretty straightforward:
For each successful build:
- Download the artifacts and deploy to dev
- Wait for approval to deploy to Test/QA
- Deploy to Test/QA
- Wait for approval to deploy to Prod
- Deploy to Prod
I’m going to share the process that led me to my current solution - it was a journey that was at times very frustrating, but I hope you’ll be able to learn from my mistakes.
The Odyssey
I had first planned to build my packages in a docker container that had the serverless Framework and Python pre-installed in the required versions. I also tried to implement it, because I didn’t want to deal with installing dependencies, but Azure Devops has a shall we say interesting approach to containers. You can execute your build jobs in them but it won’t be the same as your local machine, because Azure will install some agent in the Docker Container and mess up the permissions - i.e. you aren’t root anymore if that container is built like it. At least Azure DevOps creates a user with sudo privileges, which you can use - unless your container image doesn’t have the sudo-binaries installed, then you’ve got a problem…
Well… I had a problem. There is some kind of dirty workaround, which let’s you log into the container as root and install sudo afterwards you can run and install your software as you like. I used this workaround and got my sudo command working. Having achieved this, I was able to package the software using the AWS Script task from the AWS Tools for VSTS. Then I tried publishing my artifacts, which I was going to use from the release pipeline later.
Here I ran into another problem: No matter how hard I tried, the PublishBuildArtifact-Task always tried to upload the artifacts from the Docker-Host instead of the Container itself. I mounted paths from the host as volumes into the container and expected PublishBuildArtifact to upload them from the host, but for some reason that didn’t work either.
To recap: Azure DevOps installs a fancy agent application into the container that messes up the permission scheme and then the fancy fancy application is unable to publish build artifacts (I was mildly annoyed at this point).
Back to the drawing board.
Not having been able to make the container work the way I wanted, I decided to build the artifacts on a virtual Build Host provided by Azure - an Ubuntu 16.04 machine. This meant I had to install python and the NPM-Packages myself. Doing this with the apt package manager worked fine and I made some progress - until I realized the Ubuntu 16.04 Repos only provide Python 3.6.
I wanted to use Python 3.7 for the Lambda Runtime and packages. I was using the serverless-python-requirements plugin for the serverless framework to deal with my python dependencies, which I can recommend. This requires python to be installed in the same version you plan to use for the runtime later on.
I thought my only option was to manually install Python 3.7 on the build host but fortunately the makers of the plugin thought about this and provided a solution. You can add the following lines to your serverless.yml and the plugin will deal with the python dependencies inside of a docker container with the correct Python version installed:
custom:
    pythonRequirements:
        dockerizePip: true
This worked fine, since Azure DevOps didn’t mess with that container :-)
After building the package on the build host directly, the PublishBuildArtefact worked as well :-)
I was now able to package my resources for later deployment onto AWS!
All of this came at a cost though - doing it this way meant installing Python, NodeJS and NPM from the package manager as well as pulling the docker Image for packaging the Python dependencies. None of this is fast and my builds took ages (by ages I mean a few minutes). I couldn’t be bothered to wait that long! I figured I wasn’t the first to deal with these kinds of problems, so I started diving deeper into Azure Devops.
The most time-consuming part was installing NodeJS and NPM. Fortunately there is the NodeTool task which you can use to install both of those from some cache. This results in cutting down the time to install npm to about 5 seconds. Then I discovered the UsePythonVersion task, which provisions the Python version you need within a few seconds. This meant I could stop pulling a docker Image to package my Python requirements and updated the serverless.yml once again:
custom:
    pythonRequirements:
        # No longer necessary!
        dockerizePip: false
This resulted in the building and packaging process for all three stages taking less than a minute, which I could live with. My pipeline looked something like this at this point:
      - job: build_app
        displayName: Build Serverless Deployment Package
        pool:
          vmImage: ubuntu-16.04
        steps:

          - task: UsePythonVersion@0
            inputs:
              versionSpec: '3.7'
              addToPath: true
            displayName: Install Python

          - task: NodeTool@0
            inputs:
              versionSpec: '>10.x.x'
            displayName: Install Node

          - bash: npm install -no-cache
            displayName: Install Serverless Dependencies and Plugins

          - task: AWSShellScript@1
            inputs:
              awsCredentials: 'dev'
              regionName: 'eu-central-1'
              scriptType: 'inline'
              inlineScript: |
                                ./node_modules/.bin/serverless package --stage dev --region eu-central-1 --package /tmp/dev_artifacts/
            displayName: Package for Dev Environment

          - task: PublishBuildArtifacts@1
            inputs:
              pathToPublish: /tmp/dev_artifacts
              artifactName: dev_artifacts
            displayName: Export Dev Artifacts
Now that I had managed to package my deployment resources I began working on the deployment process itself. Not knowing about Release Pipelines I just started extending my build pipeline with a deploy_to_dev stage. Since this was running on a different server I had to install the Node-Dependencies all over again. Then I wanted to download the artifacts from my build stage, which I struggled with since there are two kinds of artifacts in Azure DevOps: Build-Artifacts and Pipeline Artifact. I had published build artifacts and was trying to download pipeline artifacts, which obviously didn’t work - I’m still not sure why there are two different kinds of artifacts…
Having solved the problem I had created myself, I felt relieved and stupid at the same time - a feeling that most of you will probably be familiar with. Anyway - after downloading the artifacts I was able to run serverless deploy --stage dev --package /path/to/package within an AWSShellScript task. Lo and behold: my resources appeared in the target account!
  - task: AmazonWebServices.aws-vsts-tools.AWSShellScript.AWSShellScript@1
    displayName: 'Deploy Package to dev'
    inputs:
      awsCredentials: dev
      regionName: 'eu-central-1'
      scriptType: inline
      inlineScript: './node_modules/.bin/serverless deploy --stage dev --region eu-central-1 --package dev_artifacts --verbose --force'
A few days later I learned about Release Pipelines, which are built to manage deployments and approval procedures - the latter can’t really be done with a build pipeline …yet. That’s what led me to split my build pipeline into a build and a separate release pipeline. Unfortunately you can’t specify the release pipeline as YAML, which is annoying, so I had to switch back to the GUI again (Release Pipelines as YAML have been announced and partially implemented - approvals are missing).
The first thing that’s very different about working with a release pipeline is that it doesn’t check out any code - which makes sense if you only want to deploy your artifacts. For me this meant that I had to create another artifact in the build pipeline that contains the package.json, serverless.yml and some other stuff I was going to need to deploy:
  - task: CopyFiles@2
    displayName: 'Copy Files to Artifact Staging Directory'
    inputs:
        Contents: |
        package.json
        serverless.yml
        .serverless/**
        environments/**
        TargetFolder: '$(Build.ArtifactStagingDirectory)'

  - task: PublishBuildArtifacts@1
    displayName: Export package.json and serverless.yml
    inputs:
        pathToPublish: '$(Build.ArtifactStagingDirectory)'
        artifactName: serverless_dependencies
Having done that, I created the release pipeline, of which a deployment Job looks like this:
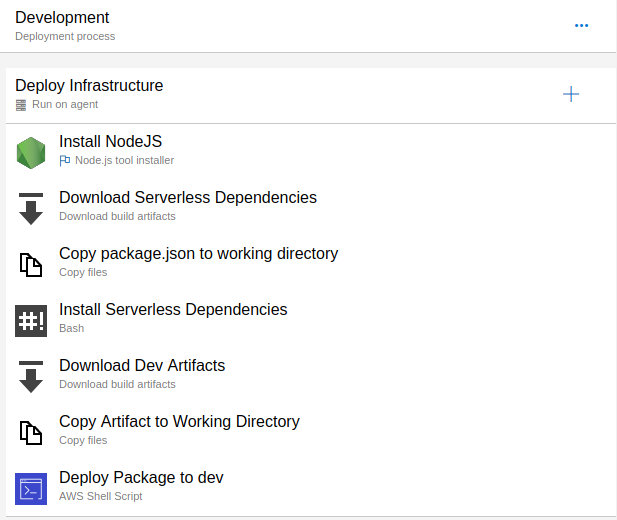
Most of the jobs work as I have already described above, the only new jobs copy some artifacts from the artifact directory to the working directory.
Takeaways
- If you use the Azure Devops the way it’s intended to be used, it can be pretty cool
- Being able to describe Release Pipelines as code would be great
- Avoid building stuff in docker containers - Azure is annyoing
- Use the predefined steps whenever you can
- AWS Integration into VSTS / Azure DevOps is pretty good
- If the Pipeline crashes during the deployment step with the error message
The security token included in the request is expiredthis just means the STS-token has expired and the Serverless Framework is unable to check the update status. I didn’t find a way to extend the lifetime or refresh the token periodically, but the important thing is: The Cloudformation Deployment continues - you’d have to check in the console for any issues yourself, if everything goes well, there won’t be a rollback. Doing a redeploy on that stage should work after the stack updates has finished.
Photo by Quinten de Graaf on Unsplash