Machine to Machine Authentication with Cognito and Serverless
Introduction
Authentication is a problem almost every IT professional has had to deal with at some point in time. Doing it right isn’t easy. What I mean by right is balancing usability and security. AWS attempts to solve this problem with AWS Cognito, which is quite nice of them, because Authentication is exactly the undifferentiated heavy lifting most customers don’t want to deal with themselves.
Unfortunately authentication is still a complex topic and Cognito is an abstraction layer for it, which makes it easier, but it’s a fairly low level abstraction conceptually in that you still need to understand most of the concepts involved in order configure it correctly.
I’m going to focus on a special case in this post and leave the more general concepts for a later post. This special case is machine to machine authentication with Cognito.
The Why
Why would you want to do that?
Great question, if you came upon this article while researching you probably have your own use case already, so I’ll keep it brief.
If you want application A to talk to another application B then A needs to authenticate itself to B. A common use case for this is a script that talks to an API-Gateway or an application behind an Application Load balancer to get some data.
Machine to machine authentication differs from human to machine authentication in the way it’s implemented. Human to machine authentication typically happens in browsers and as a result of that the underlying protocols rely heavily on HTTP redirects and HTML forms. This isn’t a great solution for automated scripts because they’d need to emulate browser behavior which is quite complex.
The How
The people that built the most widely used authentication protocols fortunately took into account that humans and machines behave differently and created different authentication flows for them. The appropriate authentication flow for m2m authentication is called client credentials and the process is fairly straightforward.
- The machine (i.e. script) authenticates itself against a Cognito Endpoint with a list of desired scopes
- Cognito verifies the credentials and checks if the machine is allowed to get these scopes
- If the credentials are valid and the scopes can be granted, Cognito returns an Access Token to the machine
- The machine can use that Access Token to Authenticate itself against the API-Gateway or an Application Load Balancer
If you stumbled upon the term scopes for the first time in an authentication context you’re right to be confused, because these are actually part of authorization.
A scope more or less is a label that describes a capability such as VIEW_PROFILE or DELETE_MESSAGE.
You can create as many scopes as you like, but without further processing they’re useless.
From the perspective of an App you get information about which scopes the current user has been granted and you yourself are responsible for implementing authorization measures based on that.
Let’s start
In this Demo we’re going to implement the following flow:
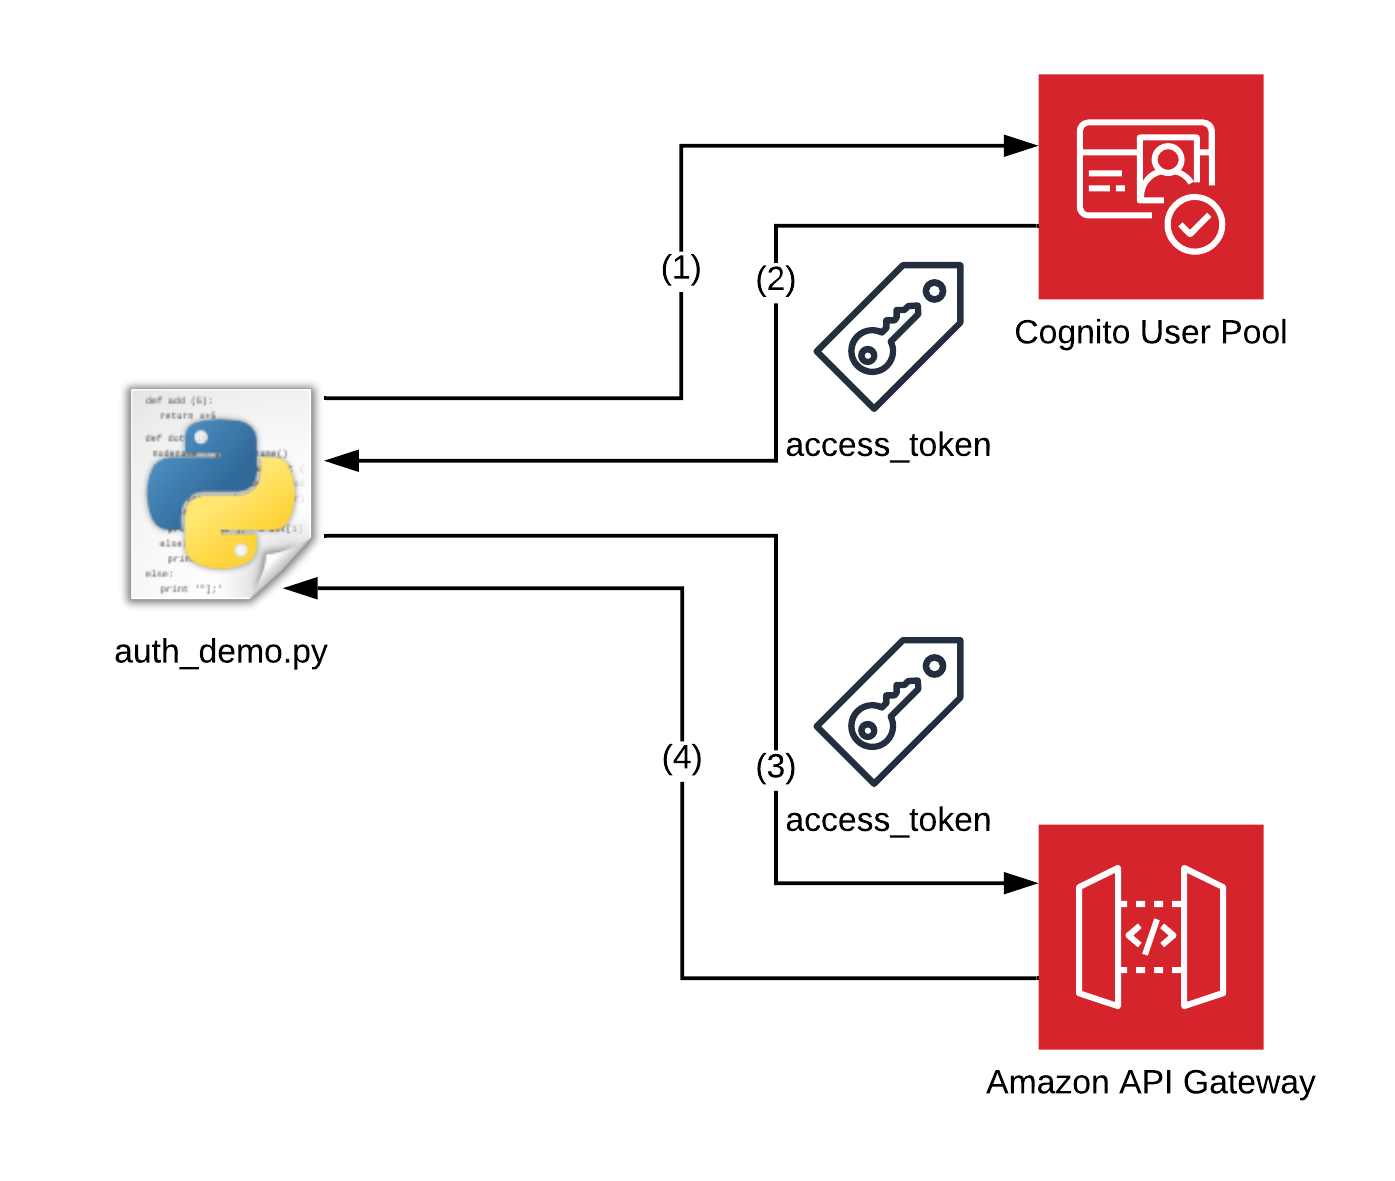
- A python script sends an HTTP-Request to a Cognito User Pool that contains the Authentication information as well as custom scopes
- Cognito authenticates the user and returns an access token
- The script passes that access token along when it calls the API Gateway
- The user pool authorizer at the API-Gateway verifies the token and returns the result
If you want to follow along, you can download the code from Github here.
Create a User Pool
First we’re going to deploy the user-pool-stack.yml with CloudFormation - it’s fairly straightforward:
Resources:

  UserPool:
    Type: AWS::Cognito::UserPool

Outputs:

  UserPoolId:
    Value: !Ref UserPool
    Description: The Id of the User Pool

  UserPoolArn:
    Value: !GetAtt UserPool.Arn
    Description: The Arn of the User Pool
The stack has two outputs, the ARN and the Id of the User Pool, both of which we’re going to need in the next step so take note.
(This has to be a separate stack, Serverless doesn’t yet support User Pools that are created in the Resources section of the serverless.yml)
Configure and Deploy Serverless
Now navigate to the Code Repo and run npm install to install all dependencies for the Serverless Framework.
Run pip install -r requirements.txt to install the python dependencies afterwards.
Afterwards open the severless.yml and locate the custom section - it should look something like this:
custom:
  userPoolDomain: some-random-domain-2348472435
  userPoolArn: INSERT USER POOL ARN HERE
  userPoolId: INSERT USER POOL ID HERE
  resourceServerIdentifier: "mydomain.com"
  scopeName: "API_ACCESS"
  scopeIdentifier: "${self:custom.resourceServerIdentifier}/${self:custom.scopeName}"
Update the userPoolArn and userPoolId with the values from the stack output and change the number inside of the userPoolDomain - it just has to be unique.
You can leave the other values as they are for now. You can find an explanation for these further below.
These are all the changes we had to make, now you can run serverless deploy and wait until the stack has been created.
Serverless: Packaging service...
Serverless: Excluding development dependencies...
Serverless: Uploading CloudFormation file to S3...
[...]
resources: 13
api keys:
  None
endpoints:
  GET - https://pd6425glvg.execute-api.eu-central-1.amazonaws.com/dev/
functions:
  hello: cognito-m2m-dev-hello
layers:
  None
Serverless: Removing old service artifacts from S3...
Take note of the URL of the GET-Endpoint, in this case: https://pd6425glvg.execute-api.eu-central-1.amazonaws.com/dev/
Get the credentials
Now you need to login to the AWS Console to retrieve the Client credentials for our script as there is currently no way to extract them via Vanilla CloudFormation.
- Log in to the AWS Console and Navigate to Cognito and inside Cognito to User Pools
- Select the App Clients under General and hit Show Details
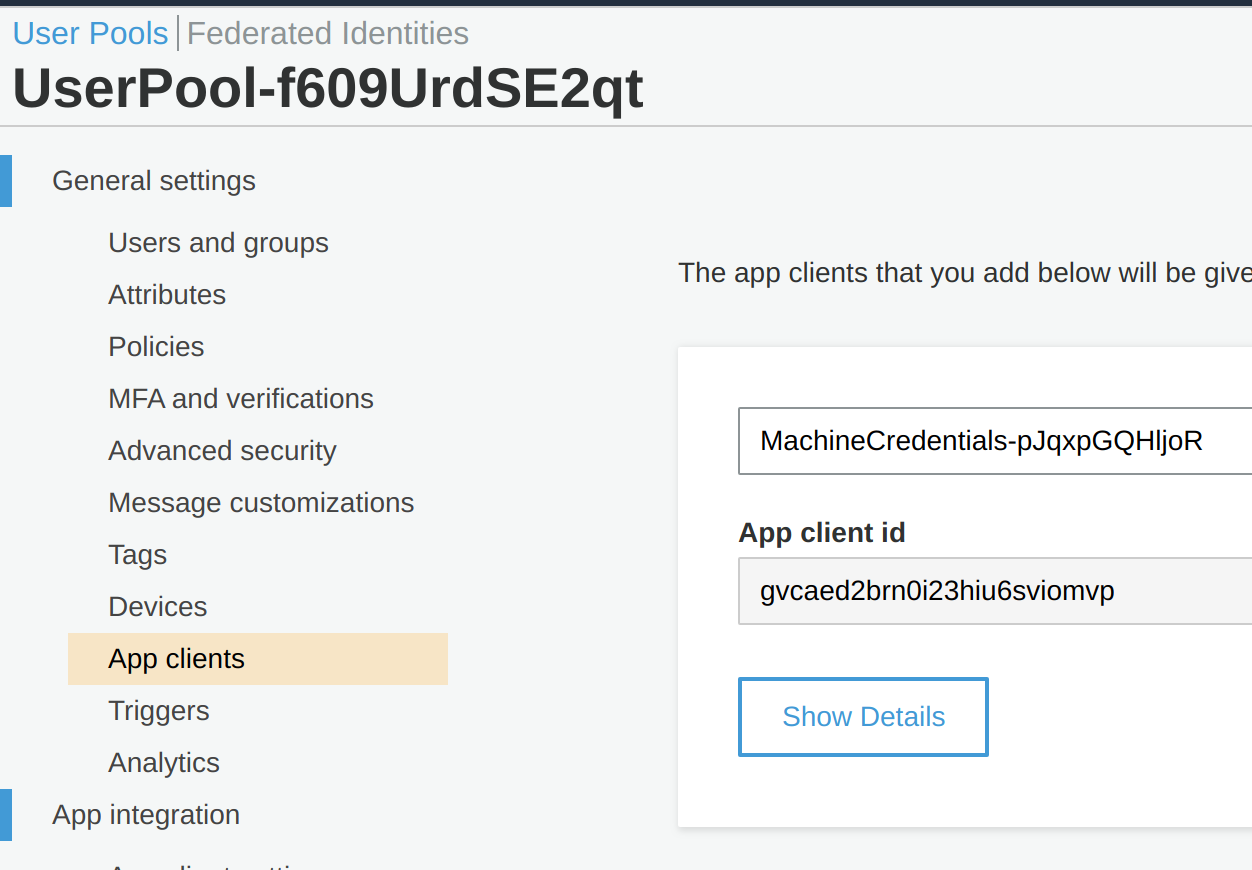
- Take note of the App Client ID and the Secret - the App Client in the Screenshot doesn’t exist anymore, don’t bother to hack it ;-)
Configure Authentication script
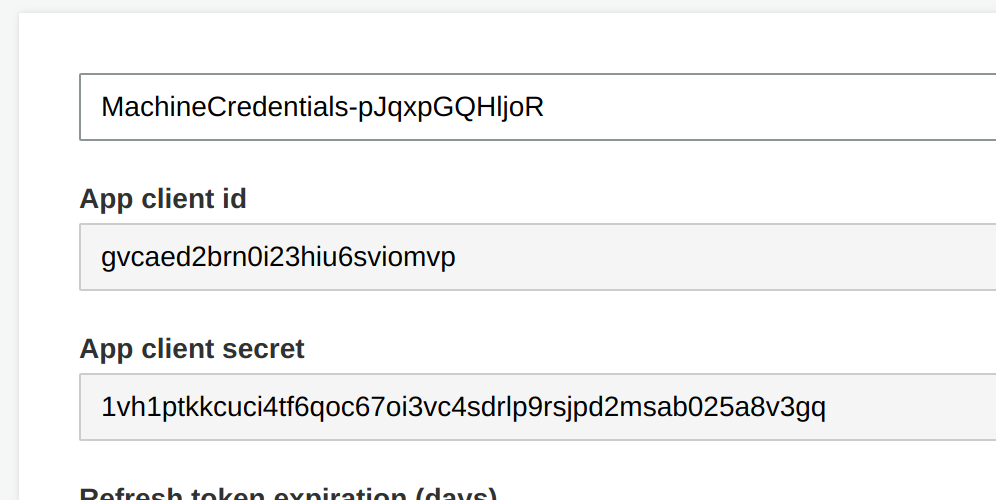
Open the auth_demo.py script and update the Global Variables under the TODO Comments to something like this:
# TODO: Replace this with your cognito domain, remember the region
AUTH_DOMAIN = "some-random-domain-2348472435.auth.eu-central-1.amazoncognito.com"
COGNITO_TOKEN_ENDPOINT = f"https://{ AUTH_DOMAIN }/oauth2/token"

# TODO: Replace these with the credentials you take from the GUI
CLIENT_ID = "gvcaed2brn0i23hiu6sviomvp"
CLIENT_SECRET = "1vh1ptkkcuci4tf6qoc67oi3vc4sdrlp9rsjpd2msab025a8v3gq"

# TODO: Replace these with your own scopes - separated with a space
LIST_OF_SCOPES = "mydomain.com/API_ACCESS"

# TODO: Replace this with your own enpoint URL
API_GW_ENDPOINT = "https://pd6425glvg.execute-api.eu-central-1.amazonaws.com/dev/"
In this case AUTH_DOMAIN corresponds to custom.userPoolDomain from the serverless.yml - CLIENT_ID and CLIENT_SECRET have to be set to the value you just extracted from the AWS Console. LIST_OF_SCOPES can stay the way it is unless you changed the name of the scope and API_GW_ENDPOINT should be set to the GET-Endpoint from the output of serverless deploy.
Now your setup is complete!
The Demo
Now that you’ve successfully set up the infrastructure let’s find out if it works. You can just run the python script and should see an output similar to this.
$ python auth_demo.py
DEBUG - get_access_token -  Body: {'grant_type': 'client_credentials', 'scope': 'mydomain.com/API_ACCESS'}
DEBUG - get_access_token -  Response: {'access_token': 'eyJraWQiOiJJSElyOUIzUTViZ0JcL0dTWE1XSXFEUk5pbUFlbU5aUXNic2JPNWluQ3hyND0iLCJhbGciOiJSUzI1NiJ9.eyJzdWIiOiJndmNhZWQyYnJuMGkyM2hpdTZzdmlvbXZwIiwidG9rZW5fdXNlIjoiYWNjZXNzIiwic2NvcGUiOiJteWRvbWFpbi5jb21cL0FQSV9BQ0NFU1MiLCJhdXRoX3RpbWUiOjE1NzcxMTE4MzcsImlzcyI6Imh0dHBzOlwvXC9jb2duaXRvLWlkcC5ldS1jZW50cmFsLTEuYW1hem9uYXdzLmNvbVwvZXUtY2VudHJhbC0xXzZ1YzlzajZITCIsImV4cCI6MTU3NzExNTQzNywiaWF0IjoxNTc3MTExODM3LCJ2ZXJzaW9uIjoyLCJqdGkiOiJmYThkNDA3ZS1lZThlLTQ5ZWItYTI3Zi1lMDcyYWI3ZWYyNGYiLCJjbGllbnRfaWQiOiJndmNhZWQyYnJuMGkyM2hpdTZzdmlvbXZwIn0.MF4KxxMXUJwymiOB5mywSIoEFAQKHN0H6Ms6TQh1kMN9tWjeklBw1aOdP0A3fCN6qPeB4jnRJpPr8lAHbpMLRWMtrknabo1twHLVWkrREUkYKgsFIJEbZJh4nS7E6rQFOtKR6fu1sa-DBXC9_TG57tMn8E1NW0gi7natb4IQSly_bmj2iycQBeBlmfldKirYK68dvLPOWEXz6_Lr5AdX4CZwsWzTEHejoY4cH76fHIr4Mv0nwMDeyV_T4vOYOJOp26ZpMIBg0xACwnrbFDqlqkUvUQXaO2B6sW-x-VY2Q_Y8z0WS48eXzl23FxjU7xunGkJPCvbuIYjhxrCs9YbWwQ', 'expires_in': 3600, 'token_type': 'Bearer'}
DEBUG - main -  GETting URL https://pd6425glvg.execute-api.eu-central-1.amazonaws.com/dev/
DEBUG - main -  Response: {'message': 'Hello World!'}
If you see the Hello World! message, the authentication flow worked.
Let’s now have a look at what’s happening under the hood.
What’s happening
The Serverless stack sets up additional Cognito Resources to the User Pool from the first stack. These include:
- A custom domain
- An app client
- A resource server
The custom domain is used to have a unique endpoint for users of the user pool to authenticate against. This doesn’t have to be a Cognito domain and you can bring your own, although that’s a little more complex.
The app client or User Pool Client as the resources is called in CloudFormation identifies our machine in this case, it specifies which scopes the machine is allowed to request and allows the client_credentials authentication flow.
MachineCredentials:
    Type: AWS::Cognito::UserPoolClient
    Properties:
    UserPoolId: ${self:custom.userPoolId}
    GenerateSecret: true
    AllowedOAuthFlowsUserPoolClient: True
    AllowedOAuthFlows:
        - client_credentials
    AllowedOAuthScopes:
        - ${self:custom.scopeIdentifier}
Every machine that connects should have its own client. Unfortunately there’s no way to extract the generated secret in vanilla CloudFormation, so I couldn’t put it into the Secrets Manager or output it for easier access.
A Resource Server defines Custom Scopes, that can be referenced in authentication flows and App Clients. Each resource server has its own namespace that is configured with the Identifier, the Name is just a label. Under Scopes you can define the actual scopes you want for that resource server.
ResourceServer:
    Type: AWS::Cognito::UserPoolResourceServer
    Properties:
    Identifier: ${self:custom.resourceServerIdentifier}
    Name: "MyResourceServer"
    Scopes:
        -   ScopeName: ${self:custom.scopeName}
            ScopeDescription: Access to the API.
    UserPoolId: ${self:custom.userPoolId}
That’s basically it for the Cognito configuration, the API-Gateway Configuration is relatively straightforward as well.
functions:
  hello:
    handler: handler.hello

    events:
      - http:
          path: /
          method: get
          authorizer:
            # Unfortunately we can't reference a user pool we create in this stack as serverelss does
            # some black magic with the ARN to extract the name for the authorizer, which seems a little
            # strange, but right now there's nothing we can do about that.
            arn: ${self:custom.userPoolArn}
            scopes:
              - ${self:custom.scopeIdentifier}
The interesting part is everything under the authorizer section, here we just specify, that any user from the User Pool that has access to the Scope that’s defined in the custom section may use this API.
This has the benefit, that the authentication works for human users and machines, because any other credentials that are issued by our user pool via different authentication flows but the same scopes are valid as well.
Let’s now look at the code that fetches the token from Cognito.
def get_access_token():

    body = {
        "grant_type": "client_credentials",
        "scope": LIST_OF_SCOPES
    }

    LOGGER.debug("Body: %s", body)

    headers = {
        "Content-Type": "application/x-www-form-urlencoded"
    }

    response = requests.post(
        url=COGNITO_TOKEN_ENDPOINT,
        data=body,
        auth=(CLIENT_ID, CLIENT_SECRET),
        headers=headers
    )

    LOGGER.debug("Response: %s", response.json())

    return response.json()["access_token"]
Essentially it’s a single HTTP-POST-Request (over HTTPS) that talks to the Token-Endpoint.
The request uses HTTP Basic Authentication with the Username being the client id and the password being the client secret.
In the application/x-www-form-urlencoded body we specify a list of scopes to request and our grant_type.
The response looks something like this:
{
    "access_token": "eyJraWQiOiJJSElyOUIzU [...]",
    "expires_in": 3600,
    "token_type": "Bearer"
}
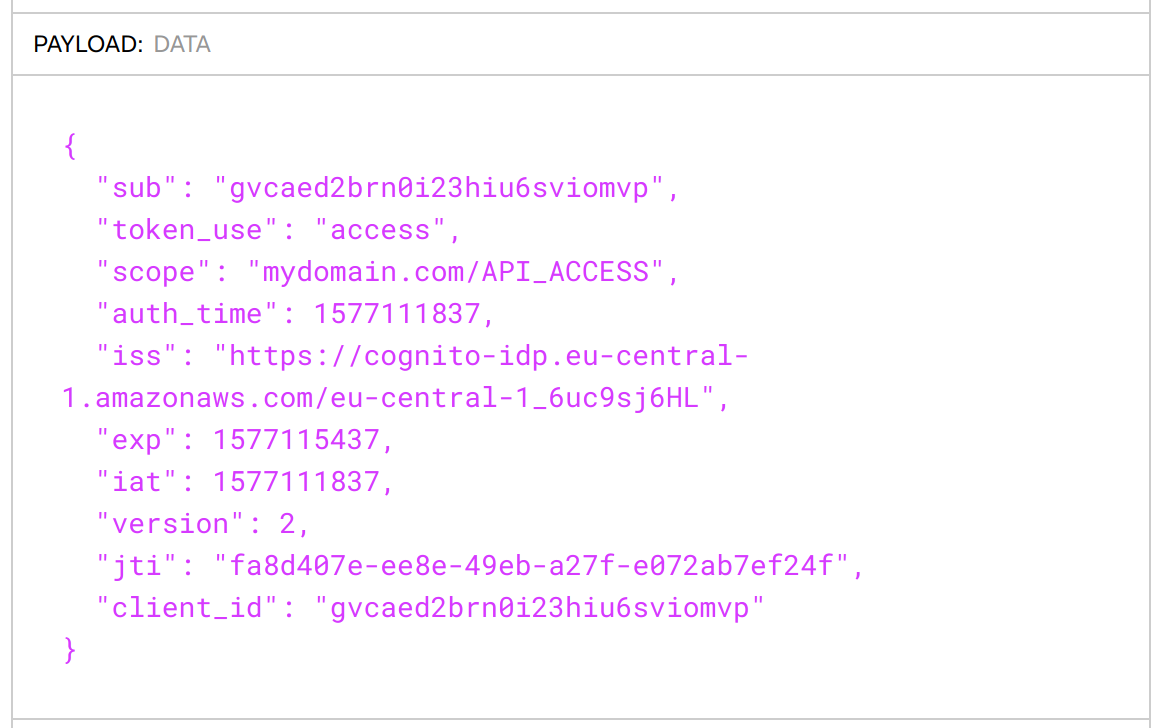
The access_token is a JSON Web Token (JWT), which we can decode using a library or in the browser with jwt.io to reveal something like this:
To use the Access Token we just pass it it its encoded form in the Authorization header like this:
access_token = get_access_token()

headers = {
    "Authorization": access_token
}

LOGGER.debug("GETting URL %s", API_GW_ENDPOINT)
response = requests.get(API_GW_ENDPOINT, headers=headers)
That’s it - that’s how you do Machine to Machien Authentication with the Serverless Framework, Python and Cognito.
For comments, questions and stuff like that, feel free to reach out to me on Twitter.